The ubiquitous milk crate is a fantastic solution towards creating effective storage onboard your fishing kayak. I’ve been using one for a number of years to hold extra fishing poles and other gear, but it’s finally time to upgrade.
I’m going to share with you the ultimate DIY milk crate for Kayak Fishing pieced together from a variety of hacks I’ve seen over the years. Best thing is, it works with any budget. Most of the material I was able to scrap together, with just a few items purchased at the local hardware store for less than $50.
Step 1: Gather Tools & Supplies
First things first. Let’s gather up all of the tools and supplies we’ll need to make this milk crate.
SUPPLIES
- Milk Crate (Find one that fits your rear hatch. Mine is a square 13”x13”x11” milk crate I picked up for $5 from Walmart. Note: Your crate will be raised off the bottom of your Kayak, allowing for a bit more room).
- 5’ of 1 ¼” PVC pipe
- 5’ of 1” PVC pipe
- 3’ of ¾” PVC pipe
- Three 1” PVC Tee
- One 1-1/4″ PVC 45 degree fitting
- One 1” PVC Plug
- One 6-8” Section of 4” PVC Pipe, thin wall
- 2 Dozen or so Heavy Duty Zip Ties or 2 Conduit Clamps, 4 bolts, washers and nuts ¼” in size for each holder
- ¾” Foam Pipe Insulation
- Small Torch light and flag for safety
- 4 d-rings
- 1” adjustable strap from local hardware store
- Duck Tape
- 4 small straps or medium size bungee chords
- Sheet Foam at least 18”x18”x3” (I use an old leaking camp sleeping pad)
- PVC Primer and Glue
- Old Wine Bottle
- Milk Crate Cutting Board Lid (Check out this tutorial on How to make your Own)
TOOLS
- Hacksaw, circular saw, Dremel etc.
- Drill with ¼” Drill Bit
- Heatgun
- Sandpaper
Step 2: Attach Rod and Net Holders
Now that we have our tools and equipment, we can get started on cutting the PVC to the proper length to hold our rods and fishing net.
DISCLAIMER: The tools you are using can be dangerous. If you think you need help, get it.
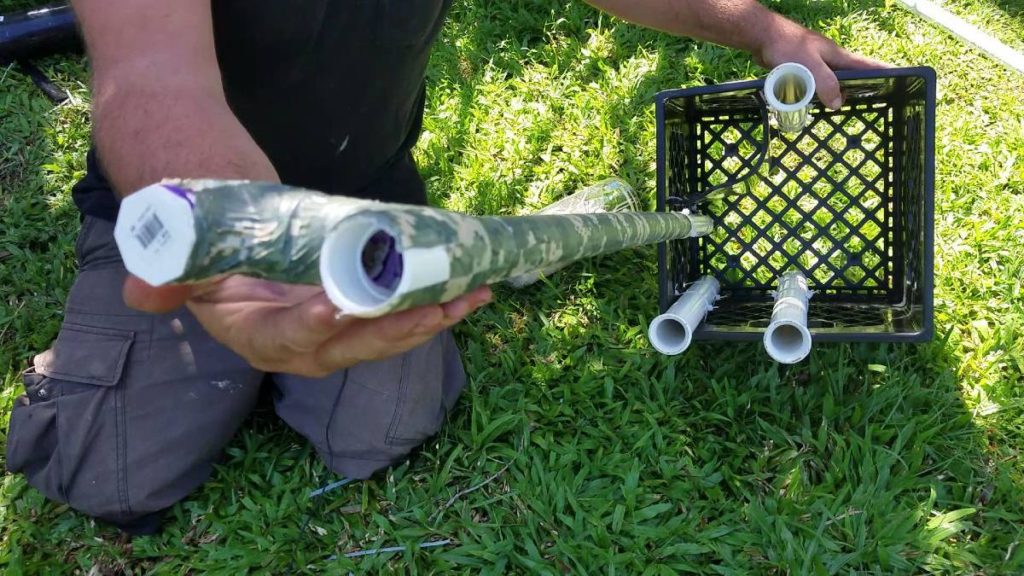
- Cut 3 sections, 15”-18” long, from your 10’ piece of 1 ¼” PVC Pipe using the saw of your choice. The length of your holders is a matter of preference, you can make them shorter or longer, I like to test how my rods fit to determine the length of holder.
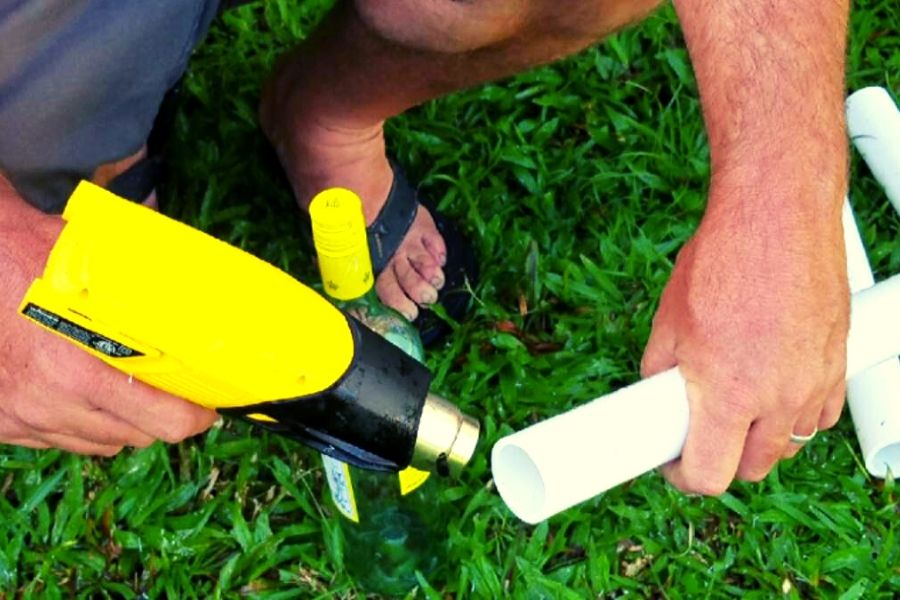
- Using a heat gun and working outdoors, heat one end of the PVC pipe till the end of the pipe is plyable. Once the PVC is soft to the touch, set it on the drinking end of a wine bottle and push down, flaring out the end of the pipe. Hold it there for 15 to 20 seconds so it can cool into its new shape.
- This part is optional, your rod holder is pretty much ready to go at this point. If so, skip to Step 5. To make a cutout for your reel to fit into, take each pipe section you will be using as a rod holder, mark out a ⅝” wide slot (or bigger depending on the base of your reel) starting at one end going 6”-8” down the length of the pipe.
Use a dremel or a jigsaw with a small blade to cut this section out. Be careful because this part can be tricky and may cause injury. - Using 80-100 grit sandpaper, sand down any burrs or rough edges that may have resulted from cutting.
- Shove a 6” section of ¾” foam pipe insulation inside the bottom of the 1” PVC rod holder. This will act as a soft seat for the rod or net handle and gives the holder some floatation.
- Drill a ¼” hole in the top of the PVC pipe to attach a rod leash if desired.
- To attach the PVC holders to crate, hold them against the INSIDE of the crate with one located in the left corner closest to the seat and 2 more opposite each other in the middle of the wall going towards the rear of the kayak, with the slotted/tapered end up. This placement leaves space for your anchor holder, safety light/camera mount and the holders for your trolley.
- Using a 1” conduit clamp, place it over your rod holder on the top and bottom area of the milk crate and mark the 4 holes. Drill a ¼” hole in the crate and secure it down with the ¼” bolts, washers and nuts. You can also drill 4 holes on the top and bottom of the milk crate and use heavy duty zip ties to secure your rod holders.
- BONUS: For trolling purposes, you can cut 2 additional 1” PVC pipe sections and connect them with a 45 degree fitting. Connect them with zipties to the rear of the crate after installing the holders for your trolley (See Below). If using this hack, make sure your crate is well secured to your kayak and your poles are leashed on. Forget this and one large strike and all your gear might just be going for a swim.
Step 3: Anchor Storage

This is one of the things I am most excited about with the new redesign of my kayak crate. I used to keep my anchor in one of my flush mounted rod holders and a spool of rope and chain in the crate. One way or another, I always found myself having to attach my anchor to a giant mess.
I first saw this idea on the Dizzyfish Kayak Fishing website out of the UK. This system keeps everything tidy, only takes a little bit of space and is easy to deploy. It looked like a great idea, so I had to try it.
- Starting at one end of a 4” pvc pipe, make a cut length wise down one side of the pipe about 6 ½” down. Try to find scrap pieces at a local construction site or hardware store.
- Cut the pipe across, 6” down from the end, leaving you a 6” section of 4” pvc pipe with a cut made length wise down one side of the pipe.
- Using a heat gun, flare the pipe out to open up the circle of the pipe up, sort of like you’re turning the pipe from a 4” pipe into an 8” pipe but the ends won’t meet.
- Drill 4 holes into each corner of the pipe and install with zipties inside one of the front corners of the milk crate, closest to your seat. It just feels natural for me to pull my anchor from the right side, so I have mine located there.
- Attach a divers reel with a couple 100ft of line to the outside of the crate with a quick release carabiner, just adjacent to where you just installed the flared 4” pipe. The line attaches to 3’ of chain that then attaches to the anchor.
- Stow the chain and anchor inside the flared pipe section that you installed inside the crate. Now you have a ready to deploy and very tidy anchor system for your fishing kayak.
Step 4: Rig Your Safety Light/Flag and Camera
When your out fishing larger bodies of water or at night, it’s important to include a safety light and/or flag so that other boats can spot you. At the same time, why not create a mount for a pole-mounted camera? I’m going to show you how to make the budget version of one of these, but you can purchase one too and add a GoPro Camera pole mount to it.
- Cut a 1” PVC pipe 3’-4’ long depending on desired height for light and camera mount.
- Attach a 1” PVC tee inline with the pipe, putting primer on both ends first, then glue.
- Attach a 1” elbow to the middle of the tee sticking out to the side, with the open elbow end facing up, using primer and glue as before.
- Install the 1” end plug into the other end of the elbow, sand surface and attach your camera mount to the PVC end plug with glue..
- Wrap insulated pipe foam and duck tape around the base of your light and snugly fit inside the other open end of your PVC pipe.
- Wrap the assembly either in insulated pipe foam secured with zip ties to make it buoyant or add decorative duck tape to the pipe to give it a cool look.
- Attach Flag to PVC pipe where it will not interfere with the camera.
- Attach the bottom of the 3’-4’ pipe section of this assembly securely to the inside of your milk crate, on the wall closest to the seat, in between the anchor and the corner rod holder with either heavy duty zip ties or conduit clamps and the appropriate hardware.
Step 5: Trolley Cart Holder
Our crate is starting to look good. Let’s add some more nifty features to this bad boy. I use a sit on top kayak with scupper holes, so I use a kayak trolley with the 2 prongs that fit through the holes. With a simple hack, you can make a secure and organized spot on your crate to store your trolley.
- Cut 2” PVC about 15”-18” long or just a little shorter than the 2 prongs on your trolley that fit into your scupper holes
- Fit the two pipe sections you just cut over the 2 prongs of your trolley that fit into the scupper holes.
- Drill a ¼” hole into one of the prongs on your trolley, going through both sides of the pipe.
- Install a 1.5” long, ¼” bolt through the hole you just made in the prong and secure it with a wingnut. This will hold your trolley in place while you are paddling and fishing.
- With the PVC still on the kayak trolley, take the whole thing and flip it upside down onto the inside back wall of your milk crate.
- Attach the PVC with zipties or conduit clamps to the milk crate.
That’s it! You’re done. Now you have a sweet little spot for your trolley to stow away nicely.
Step 6: Store your Tackle
I used to just throw most things into my crate, including my tackle boxes and various lines, in a jumbled mess. I’d have to reach behind me and jostle through that mess to find whatever it is I was looking for. While looking into creating a better organization for my crate, I came across this great idea by Palmetto Kayak Fishing.
- Cut a length of 1” PVC pipe ¼” to ½” less than the width of your Milk Crate, mine is about 13” across.
- Add rubber chair leg protectors to either end of the PVC pipe.
- Place the PVC pipe into the bottom of the milk crate about 3”-4” off the bottom, parallel to each other about 3” apart. One of the pipes should be resting against your trolley holder and the other should be resting against the middle rod holders.
- Attach one pipe with zipties to your PVC trolley Holder and the other pipe with zip ties to rod holders in the middle of the crate (see picture below).
- Run a section of bungee cord through 2 holes on the top of your milk crate, parallel to the PVC pipe below (you may have to drill 2 holes). Tie the ends off so the bungee cannot come back through the holes.
- Run another bungee over the horizontal bungee you just installed and connect each end to both PVC pipe.
We just created a perfect shelf for our Plano tackle boxes, with the bungees holding them snugly in place. Beneath the PVC shelf there is room to store more gear, plus, you only took up half the space in your crate. There’s still more room!
Step 7:Add a Filet Station
You may have seen some Kayak Fishing crates to be outfitted with the rod holders on the outside of the crate. I originally planned on doing the same and then install a lid for my crate made out of a cutting board (Check out this tutorial Instructables on adding a lid to a milk crate but substitute the plywood lid they use for a plastic or wood cutting board).
Problem is, I love the new storage space for my anchor. With that set up, there is no way I can put a lid on my crate unless I cut the corner where my anchor pops above the height of the crate.
I solved that problem by installing all the rod holders inside the crate and attaching a cutting board to the outside of the crate. That way, after removing rods out of their holders, I can lay the crate anchor side down, with the cutting board fastened on the same side as my trolley cart holder. I don’t have to take anything out besides the poles and have a nice cutting surface to work on when I am back at camp.
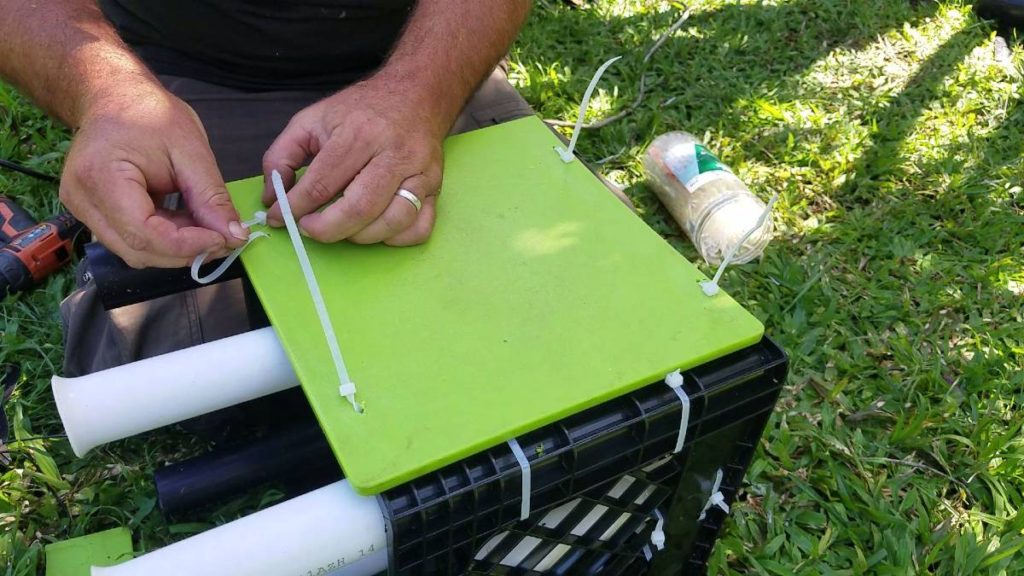
- Find a cutting board as close to the size of the side wall of your crate as you can get it.
- Drill 4 holes in cutting board and 4 holes in their corresponding spots on the milk crate if necessary.
- Zip Tie it on.
Now you have an awesome spot to do some chopping on those overnight, outdoor kayak fishing trips. Be sure to clear out your crate and give it a good hosing when you get back from your trip.
Step 8: Make a Handle
My first job was in construction and I remember my boss telling me to never walk around empty handed. You go to drop something off in one place, you better be coming back with something that needs to go to another place. Ever since then I have always tried to figure out how to be efficient with my trips.
Having a handle allows me to carry all my gear in a crate with one hand and something else in my other,
Having a handle allows me to carry all my gear in a crate with one hand and something else in my other, instead of having to use both hands to carry the crate like before.
To make a handle, I just tie a rope to both handles on either side of my crate. You can use any material you want. Old backpack straps can be used to make adjustable length handles. You can attach a PVC pipe across the top of your crate with zipties to create a handle. Whatever you have laying around. Just remember to add a handle, It makes things so much easier.
Step 9: Test It Out
Most people don’t do this, but you should really test it all out before you get in the water. Place your fully equipped crate on the ground or in your kayak and sit next to it like you were in the water. Try to take something out. Does it work for you?
Just because I feel comfortable with the placement of everything doesn’t mean you will. Maybe you want to switch which side your anchor goes on or just don’t agree with how your tackle boxes are stored.
Either way, now is the time to figure all that stuff out, not when your miles out on the water. Give yourself this time to make all those last minute tweaks that make this Kayak crate custom for YOU.
Step 10: Secure it down
Once your crate is fully customized, there is just one more thing you have to do. You have to secure your crate to your kayak. You can do this with bungee cords if you’ll be fishing calm waters like lakes and ponds, but if you’re going out in rough water you should really be sure your crate is tied down securely.
- Cut a 3” thick piece of foam or other material (I use an old blow up sleeping mat for backpacking) and place directly under where the milk crate will go on the kayak. Put the Milk Crate on top.
- Find 4 connection points on your kayak that are equal to the four corners of your crate, utilizing the corners that are on the opposite SIDES from each other. Mark and drill ⅛” pilot holes at those 4 locations.
- Attach D-rings with ⅝” screws at those 4 locations on the kayak using silicon to seal all holes.
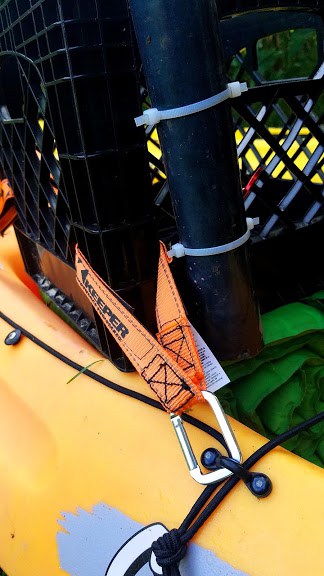
- Take your strapping and run one end through the eye hook and one end through the milk crate and connect them at the clasp, tightening each one down. Do all 4 corners.
I like to use a velcro strap that’s easy to take on and off that gets connected by carabiner to my kayak and straped down through a hole in the milk crate. See Image above..
Time to Hit the Water
Your custom Kayak crate is done. You are ready to hit the water. With this crate, you should have everything you need, stored in a safe place for you to confidently hit the water.
I hope these tips helped. I love all the cool hacks people come up with and it’s my hope that this hacked out milk crate will deliver for you. It didn’t cost much and it’s way cooler than any crate that you can buy. Happy Fishing!!